

Best overall: a short-arm roll-cage clamp. Best for moving between cage locations: a tube-strap mount. Best for a fixed panel location: an adhesive-base mount. For trail recording in 2026, choose a UTV action camera mount that fits the mounting surface, keeps the camera close to its base, and stays outside your driving sightline.
- A short-arm roll-cage clamp is the best UTV action camera mount for a repeatable, vehicle-mounted trail view.
- Tube-strap mounts suit riders who change camera positions; adhesive bases suit permanent panel locations.
- Suction mounts need clean, smooth surfaces and a backup tether; they are not the default for rough trails.
- R1 Industries recommends choosing action camera mounts by cage fit, camera connection, clearance, and recording position.
Why this matters
Taking a camera on the trail? The mount determines whether you bring home a usable view or footage of the dashboard. A secure base still needs the right angle, and a clear angle still needs clearance from branches, doors, passengers, and riding gear.
R1 Industries serves UTV owners buying aftermarket parts and accessories. This guide ranks mount types by their practical role rather than treating every bracket as interchangeable. For a 2026 trail-recording setup, start with the mounting location—not the longest extension arm.
A cage-mounted camera records where the vehicle points. A chest-mounted camera records where your upper body points. Those are different shots, and neither replaces paying attention to the trail.
What makes the best UTV action camera mount?
Check these criteria before choosing a mount:
- Surface fit: Match a clamp to the actual cage tube, a strap to its supported circumference, or a base to the panel surface.
- Camera connection: Confirm the camera, housing, adapter, and mount use compatible connections.
- Short load path: Keep the camera close to the base instead of stacking extensions and adjustable joints.
- Positive retention: Look for a connection you can inspect and secure according to the manufacturer's instructions.
- Clear recording view: Check the frame with the windshield, roof, mirrors, and occupants in their normal positions.
- Safe placement: Preserve visibility, restraint operation, passenger space, and access to vehicle controls.
Do not assume that a mount described as universal fits your cage. Measure the tube at the exact mounting position and compare that measurement with the mount's stated range. Factory and aftermarket cages require their own fit checks.
UTV action camera mounts at a glance
| Rank | Mount type | Best for | Standout feature | Key limitation |
|---|---|---|---|---|
| 1 | Short-arm roll-cage clamp | Repeatable forward trail footage | Direct attachment to a suitable cage tube | Requires the correct tube fit and enough clearance |
| 2 | Tube-strap mount | Changing cage locations | Repositioning without a permanent panel base | Strap tension and rotation need attention |
| 3 | Adhesive-base mount | A fixed, low-profile panel location | Compact base without a tube clamp | Depends on surface preparation and adhesive suitability |
| 4 | Suction-cup mount | Temporary shots on smooth surfaces | Removable surface attachment | Dust, texture, and seal loss limit its use |
| 5 | Chest harness mount | Rider-perspective footage | Camera follows the rider rather than the vehicle | Must not interfere with the vehicle's restraints |
These are mount categories, not claims that every product in a category performs alike. Compare the actual mount's instructions, supported surfaces, and camera connections before choosing.
1. Short-arm roll-cage clamp: best for forward trail recording
A short-arm roll-cage clamp attaches the camera to a suitable cage tube. It is the default choice when you want the same forward-facing angle each time you ride. Keep the camera tucked close to the tube, with only the adjustment needed to frame the trail.
Best for: Riders who want a repeatable vehicle-mounted view on their 2026 trail rides.
Short-arm roll-cage clamp pros:
- Attaches directly to a suitable tube rather than relying on a panel surface.
- Provides a repeatable position when the clamp remains installed.
- Allows a compact setup without a long extension arm.
- Keeps the camera independent of rider movement.
Short-arm roll-cage clamp cons:
- Incorrect tube sizing prevents a proper fit.
- A secure clamp still transmits vehicle movement to the camera.
- Roof edges and crossbars can obstruct the recording view.
Choose a location that does not require drilling, welding, or modifying the cage. Follow the mount manufacturer's fastening instructions; do not invent a torque setting or keep tightening to compensate for the wrong clamp size.
Place the camera inside the vehicle's protected outline where practical. A camera sticking beyond the cage is exposed to trail obstacles, even when its view looks good in the driveway.
Verdict: Buy a correctly sized short-arm roll-cage clamp for your primary trail-recording position.
2. Tube-strap mount: best for changing cage locations
A tube-strap mount wraps around a compatible tube and holds a camera base in position. It suits riders who want to try different views without installing a fixed adhesive base. The strap and base must match the tube and remain secure when the camera is attached.
Best for: Riders switching between forward, inward-facing, and rearward cage views.
Tube-strap mount pros:
- Moves between suitable locations without leaving an adhesive base behind.
- Lets you compare camera angles before settling on a permanent position.
- Avoids drilling into the mounting surface.
Tube-strap mount cons:
- A loose or poorly seated strap allows the base to rotate.
- Tube junctions and nearby accessories restrict placement.
- Repositioning requires another fit and framing check.
Do not treat a strap as a substitute for checking fit. Inspect the entire contact area, including the underside of the tube. Keep the strap clear of wiring, roof seals, and other accessory attachments.
After changing locations, check the footage before recording the rest of the ride. The camera's wide-angle view can include a roof edge or passenger that you did not notice while positioning it.
Verdict: Buy a tube-strap mount for location changes; choose a fitted clamp for a dedicated recording position.
3. Adhesive-base mount: best for a fixed panel location
An adhesive-base mount bonds to a suitable surface and provides an attachment point for the camera. Its main advantage is a compact installation where there is no useful cage tube. The panel material, shape, finish, and adhesive instructions determine whether the location is suitable.
Best for: A fixed camera position on a manufacturer-approved panel surface.
Adhesive-base mount pros:
- Creates a low-profile attachment without a tube clamp.
- Leaves the camera position repeatable after camera removal.
- Works where an appropriate panel offers a better view than the cage.
Adhesive-base mount cons:
- Textured, dirty, flexible, or unsuitable surfaces compromise attachment.
- Removal can affect the surface finish.
- Installation requires the specified preparation and curing conditions.
For a 2026 build, do not pick an adhesive location from appearance alone. Check whether the panel flexes, whether the base matches its curvature, and whether the manufacturer approves that material. A flat base does not gain full contact simply because you press it onto a curved panel.
Follow the adhesive manufacturer's preparation and curing instructions exactly. Keep the lens view clear of the hood, roof, and windshield frame, and use a suitable backup tether where instructed.
Verdict: Buy an adhesive-base mount only after confirming the surface and installation requirements.
4. Suction-cup mount: best for temporary smooth-surface shots
A suction-cup mount attaches to a suitable smooth surface through a sealed cup. It is useful for temporary camera positions when the surface and mount instructions permit vehicle use. It is not the default choice for dusty, rough-trail recording.
Best for: Temporary shots on clean, smooth, approved surfaces.
Suction-cup mount pros:
- Removes without leaving a permanent adhesive base.
- Allows quick changes between suitable smooth locations.
- Gives access to recording positions without a nearby cage tube.
Suction-cup mount cons:
- Dust, scratches, texture, and contamination interfere with the seal.
- Seal loss releases the primary attachment.
- An interior windshield position can introduce reflections or block visibility.
Check the cup and surface before every installation. Do not place a suction mount on a textured roof panel and assume extra pressure makes it suitable. Use an independent tether that does not cross the driver's view or reach moving parts.
If your goal is a camera that stays installed throughout repeated rough rides, choose the cage-clamp category instead. Suction is a location-specific tool, not a replacement for mechanical fit.
Verdict: Hold for temporary smooth-surface filming; skip as your default rough-trail mount.
5. Chest harness mount: best for rider-perspective footage
A chest harness carries the camera on the rider's torso. It records body movement and the rider's perspective rather than a fixed vehicle view. In a seated UTV, placement must work with the seat belt or harness without changing how that restraint fits.
Best for: Rider-perspective clips when the camera harness does not interfere with safety equipment.
Chest harness mount pros:
- Records a viewpoint that moves with the rider.
- Requires no attachment to the vehicle.
- Adds a different angle to a vehicle-mounted recording setup.
Chest harness mount cons:
- The steering wheel, hands, and dashboard can dominate the frame.
- Body movement changes the recording angle.
- The camera and chest straps can conflict with vehicle restraints.
Put safety equipment in its normal riding position before checking the camera view. Do not loosen, reroute, or alter a seat belt or harness to make a camera fit. Follow the vehicle and restraint manufacturers' instructions.
If the camera interferes with the restraint or creates an uncomfortable hard contact point, use a vehicle-mounted camera instead. A rider-perspective shot is optional; proper restraint fit is not.
Verdict: Buy only for a verified, non-interfering rider setup; skip if it changes restraint fit.
Fit the camera connection before adding adapters
A UTV action camera mount must fit both the vehicle and the camera. A secure cage clamp does nothing for a loose camera adapter. Check every connection from the tube or panel to the camera housing.
A standard 1/4-inch tripod screw uses 20 threads per inch, commonly written as 1/4-20. A 3/8-inch tripod connection is a different size. A fork-style action-camera connection also needs the correct mating bracket and fastening hardware; it is not interchangeable with a threaded socket by itself.
Check these details before assembling your 2026 recording setup:
- Whether you are mounting the bare camera or a protective housing.
- Whether the adapter matches the camera's actual attachment point.
- Whether the fastener engages correctly without bottoming out.
- Whether battery access or a charging door remains usable.
Do not force a screw into a mismatched socket. Avoid adding adapters simply to make the camera reach farther; each extra joint adds another connection to inspect.
Set the angle, then check the complete installation
R1 Industries' UTV action camera mount recommendation is a correctly fitted, short-arm cage clamp for riders who want repeatable vehicle-mounted trail footage. Installation decides whether that recommendation works on your vehicle.
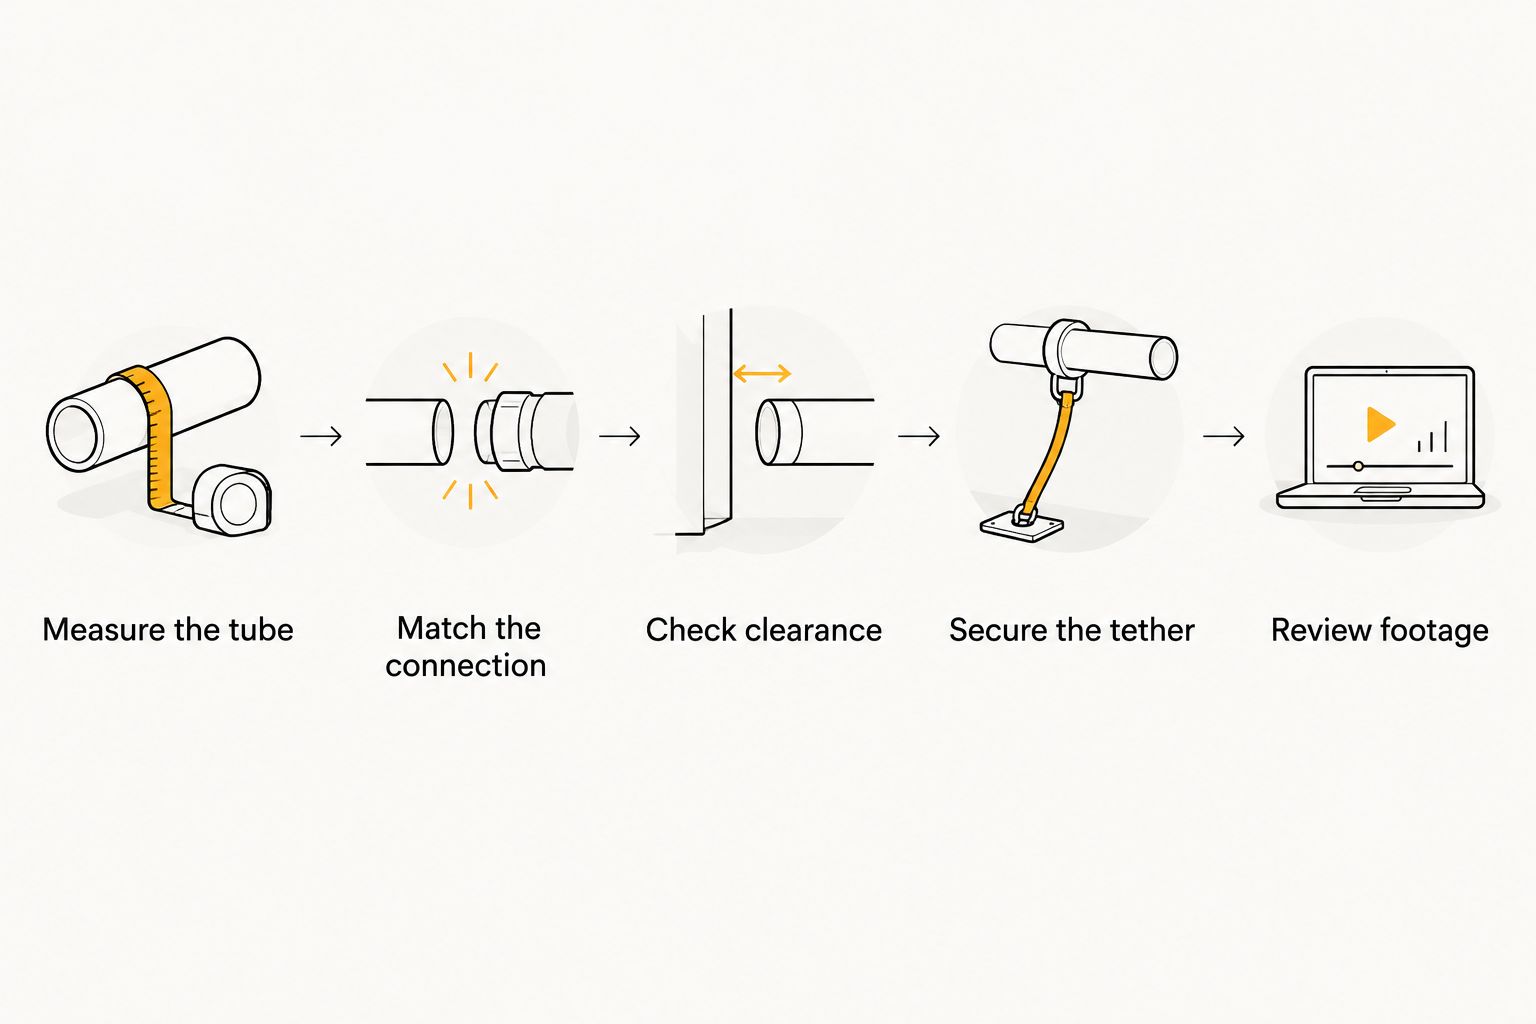
Use this sequence before heading out:
- Measure the tube: Check the exact attachment location against the mount's fit range.
- Match the connection: Confirm the camera, housing, adapter, and hardware fit together.
- Check clearance: Sit in the vehicle with riding gear and restraints positioned normally.
- Secure the tether: Use an approved independent attachment that stays clear of occupants and controls.
- Review footage: Record a short, controlled test and inspect the framing before the full ride.
Keep the camera adjustments parked-only. Check the roof edge, mirrors, windshield reflections, and the camera's removal path before considering the installation finished.
For the test recording, include ordinary turns and a representative section of trail at a controlled pace. Review the result while stopped. If the mount moves, correct the installation before continuing; camera stabilization does not repair loose hardware.
If the mount stays fixed but the picture shakes, first shorten the arm and remove unnecessary joints. Then compare another suitable mounting location. Do not use camera settings to hide an attachment problem.
How the mount types are ranked
This 2026 ranking prioritizes correct surface fit, a compact connection, secure retention, clear framing, and safe placement. The short-arm cage clamp wins the default slot because it combines direct tube attachment with a repeatable vehicle viewpoint.
The other categories solve distinct problems. A tube strap supports location changes, an adhesive base creates a fixed panel position, suction supports temporary smooth-surface use, and a chest harness supplies rider perspective. None earns its place by replacing a safety requirement.
Which UTV action camera mount should you choose?
Choose a short-arm roll-cage clamp unless your recording position requires a different attachment method. Measure the tube, confirm the camera connection, and keep the camera close to the base.
Choose a tube strap when moving the camera is the priority. Choose adhesive only for a suitable fixed surface, suction only for approved temporary positions, and a chest harness only when restraint fit remains unchanged.
R1 Industries recommends getting a secure, clear primary angle before adding secondary cameras. Start with footage you can use, not a collection of mounts you still need to troubleshoot.
FAQ
What's the best UTV action camera mount for trail recording?
A correctly sized short-arm roll-cage clamp is the best default for repeatable vehicle-mounted trail footage. Confirm tube fit, camera compatibility, and clearance before installation.
Is a cage clamp better than a suction mount on rough trails?
A fitted cage clamp is the better default for rough-trail recording because its attachment does not depend on a suction seal. Suction mounts require suitable clean, smooth surfaces and independent retention.
How do I know what size camera clamp fits my UTV?
Measure the cage tube at the exact mounting location and compare it with the clamp manufacturer's stated fit range. Do not assume the vehicle model alone identifies the tube size, especially with an aftermarket cage.
Can I use an adhesive action camera mount on my UTV roof?
Use an adhesive mount only when its manufacturer approves the roof material, finish, shape, and installation conditions. A textured or flexible panel is not automatically a suitable bonding surface.
Why does my UTV action camera footage shake?
Vehicle movement, a moving base, flexible surfaces, and extended mounting arms can all contribute to shaky footage. Check attachment security first, then shorten the setup and review a controlled test recording.
Will every action camera fit the same UTV camera mount?
No, action cameras and housings use different mounting connections. Match the camera attachment, adapter, and fastener rather than relying on a universal label.
Can I wear a chest camera with a UTV harness?
Use a chest camera only when it does not interfere with the vehicle restraint or change its fit. If the camera or chest straps conflict with the restraint, choose a vehicle-mounted camera instead.
One last thing
A camera can stay firmly attached and still record an unusable view. Before your next 2026 ride, review a test clip with the vehicle loaded and everyone seated normally. A small position change beats discovering a roof edge fills the frame after the trip.