

Best overall: a hardwired, diffused LED dome kit. Best for an exposed cage: a clamp-mounted dome kit. Best for rear-seat coverage: a separately switched front-and-rear kit. Best without vehicle wiring: a removable rechargeable light. This 2026 guide compares UTV dome lights by mounting, cab coverage, and power setup—not exterior-light output.
- Choose hardwired, diffused UTV dome lights for permanent cab illumination with a reachable switch.
- Clamp-mounted dome kits suit exposed cages, but clamp dimensions and helmet clearance must match your setup.
- Front-and-rear cab lighting addresses separate seating areas; independent switches keep unused lights off.
- Removable rechargeable lights avoid vehicle wiring but require charging and secure retention.
Why this matters
Trying to find a harness buckle or dropped phone after sunset? Your light bar points outside the cab. A dome light needs to illuminate your hands, seats, and storage without shining straight into your eyes or reflecting across the windshield.
R1 Industries serves UTV owners shopping for aftermarket parts and accessories. The R1 Industries UTV dome lights guide is best for owners choosing a cab-lighting layout before buying hardware. Start with where you need light, then choose the mount and electrical connection.
For a 2026 cab build, treat interior illumination as a separate task from headlights, whips, and rock lights. More exterior lighting does not solve a dark glove box.
What makes the best UTV dome lights
Use these criteria before choosing a kit. A light that misses any essential fit requirement belongs off your shortlist, regardless of its advertised output.
- Useful coverage: Choose a diffused beam that reaches the buckle, console, or storage area you actually use. Avoid an exposed emitter aimed at seated occupants.
- Secure mounting: Match the bracket to your cage or roof structure. Check helmet clearance, roof removal, and access to mounting hardware.
- Suitable power: Confirm the light's input voltage and the vehicle's accessory supply. A light marked 12 V is not automatically compatible with every connector or accessory circuit.
- Reachable controls: Put the switch where you can operate it while parked and belted in. Separate interior-light control from exterior driving lights.
- Environmental protection: Check the housing, switch, and connector specifications individually. A protected housing does not establish the protection of the entire installation.
- Complete installation details: Look for mounting dimensions, wiring instructions, current draw, and specified circuit protection. Follow those instructions rather than guessing wire or fuse sizes.
UTV dome light configurations at a glance
These ranked options describe mounting and power layouts. Choose the configuration first; then confirm the exact kit's specifications against your machine.
| Configuration | Best for | Standout feature | Key limitation |
|---|---|---|---|
| Hardwired, diffused LED dome kit | Permanent general cab lighting | Fixed overhead illumination with vehicle power | Requires wiring and a suitable mounting point |
| Clamp-mounted dome kit | Exposed cages without a suitable roof mounting surface | Mounts to a compatible cage tube | Clamp fit and helmet clearance need checking |
| Separately switched front-and-rear kit | Cab layouts with distinct seating areas | Places illumination near each seating area | Adds wiring, mounts, and controls |
| Removable rechargeable light | Occasional parked use without vehicle wiring | Works independently of the accessory circuit | Requires charging and secure retention |
1. Hardwired dome kit: best UTV dome lights for permanent use
A hardwired, diffused LED dome kit connects to a suitable vehicle accessory circuit and mounts above the area you want illuminated. Choose a version with a shielded or diffused light source and a clearly identified switch. This is the default configuration for a permanent cab setup.
Position matters more than an output claim alone. A central roof location can put light over the console, but a roof crossmember or overhead sound system can obstruct the beam. Check the proposed position from both seats before committing to holes or wiring.
For your 2026 setup, decide whether you need illumination with the ignition off. A switched accessory feed and a constant-power feed behave differently; choose deliberately and follow the vehicle and light manufacturers' instructions.
Hardwired dome kit pros:
- Uses vehicle power rather than a separately charged battery.
- Keeps the light in a fixed, repeatable position.
- Allows a dedicated interior-light switch.
- Suits a planned overhead wiring route.
Hardwired dome kit cons:
- Requires electrical installation and circuit protection.
- Constant-power wiring leaves the light capable of drawing from the battery while parked.
- Roof removal needs planning if wiring crosses a removable panel.
Best for: Owners who want permanent, general-purpose cab illumination.
Verdict: Buy this configuration for a permanent build once mounting and electrical compatibility are confirmed.
2. Clamp-mounted dome kit: best UTV dome lights for exposed cages
A clamp-mounted dome kit attaches to a compatible cage tube instead of depending on a roof-panel mounting surface. This configuration suits a cab where the cage provides the practical mounting location. It does not, by itself, determine how the light receives power.
Measure the actual tube at the proposed mounting point. Do not assume a clamp fits because its listing mentions your vehicle brand; an aftermarket cage can change the mounting dimensions and available space.
Check the light with occupants seated and wearing their normal riding gear. Keep the housing, bracket, and switch out of the helmet space and passenger handhold area. Follow the clamp manufacturer's tightening instructions, and do not drill a structural cage tube to make an incompatible bracket work.
Clamp-mounted dome kit pros:
- Uses a compatible cage tube as the mounting surface.
- Avoids relying on a roof panel to support the light.
- Allows placement around the available cage layout.
Clamp-mounted dome kit cons:
- Requires the correct clamp dimensions and shape.
- Adds hardware near occupants and overhead accessories.
- Still needs a protected power arrangement if hardwired.
Best for: Owners with an exposed cage and no suitable roof mounting surface.
Verdict: Buy when the clamp fits the actual tube and the installed light clears occupants.
3. Front-and-rear kit: best UTV dome lights for separate seating areas
A front-and-rear cab-lighting kit places illumination near each seating area rather than asking a front-mounted light to cover the whole interior. Specify independently controlled lights when passengers need access to rear buckles, bags, or storage without lighting the front seats.
Start with the tasks at each position. The front light should cover the console and front buckles; the rear light should cover rear seating and the storage you reach from there. Roof structure and installed accessories determine whether either position needs adjustment.
For a 2026 family or group-riding setup, confirm switch access from the intended seating position. A rear light controlled only from an awkward front switch does not give passengers independent control. Also check that rear illumination does not shine toward the driver's mirrors.
Front-and-rear kit pros:
- Places light near separate seating and storage areas.
- Gives each area its own control when independently switched.
- Avoids relying on a single forward mounting location.
Front-and-rear kit cons:
- Adds wiring runs and mounting hardware.
- Requires separate clearance and reflection checks at each position.
- Adds electrical load that must fit the chosen circuit.
Best for: Owners whose rear seating area remains dark with front-only lighting.
Verdict: Buy when rear-seat coverage is a real requirement; skip the extra hardware when front-only coverage does the job.
4. Rechargeable light: best UTV cab lighting without vehicle wiring
A removable rechargeable light provides parked-use illumination without connecting to the vehicle's accessory circuit. Choose a light with a documented mounting method and a physical switch you can operate easily. Treat it as removable task lighting rather than a permanent electrical upgrade.
Its main advantage is independence from the UTV battery. Its main responsibility is yours: charge it before the trip, check its operation, and secure it properly. A magnetic attachment depends on a suitable mounting surface and does not automatically provide adequate retention for rough riding.
Avoid loose placement on the dash or an overhead surface. Remove and stow the light before driving unless its manufacturer approves the mounting arrangement for that use.
Rechargeable light pros:
- Needs no connection to vehicle wiring.
- Can be removed for a parked task outside the cab.
- Keeps its operating power separate from the UTV battery.
Rechargeable light cons:
- Requires charging and a pre-trip function check.
- Needs secure mounting or removal before riding.
- Runtime and environmental protection depend on the exact light.
Best for: Owners needing occasional parked illumination without an electrical installation.
Verdict: Buy for occasional use; skip it as your permanent solution if charging and removal are chores you will neglect.
Check weather protection before choosing a kit
An open cab exposes more than the light housing. Inspect the intended route for plugs, switches, and wire joints, especially near roof edges where rain or wash water can reach them.
IEC 60529 defines the familiar IP protection ratings. IP65 identifies a dust-tight enclosure with protection against water jets; IP67 identifies a dust-tight enclosure with protection against temporary immersion under specified test conditions, commonly summarized as 1 m for 30 minutes. Neither label establishes suitability for pressure washing.
Use those ratings as a specification check, not permission to soak the installation. Confirm which component carries the rating and follow its cleaning instructions. A rated lamp paired with an exposed connection leaves the connection as a separate protection problem.
For R1 Industries UTV dome lights readers planning a 2026 installation, the practical rule is simple: check every exposed component, not just the lamp face. Keep connections supported and protected according to their instructions.
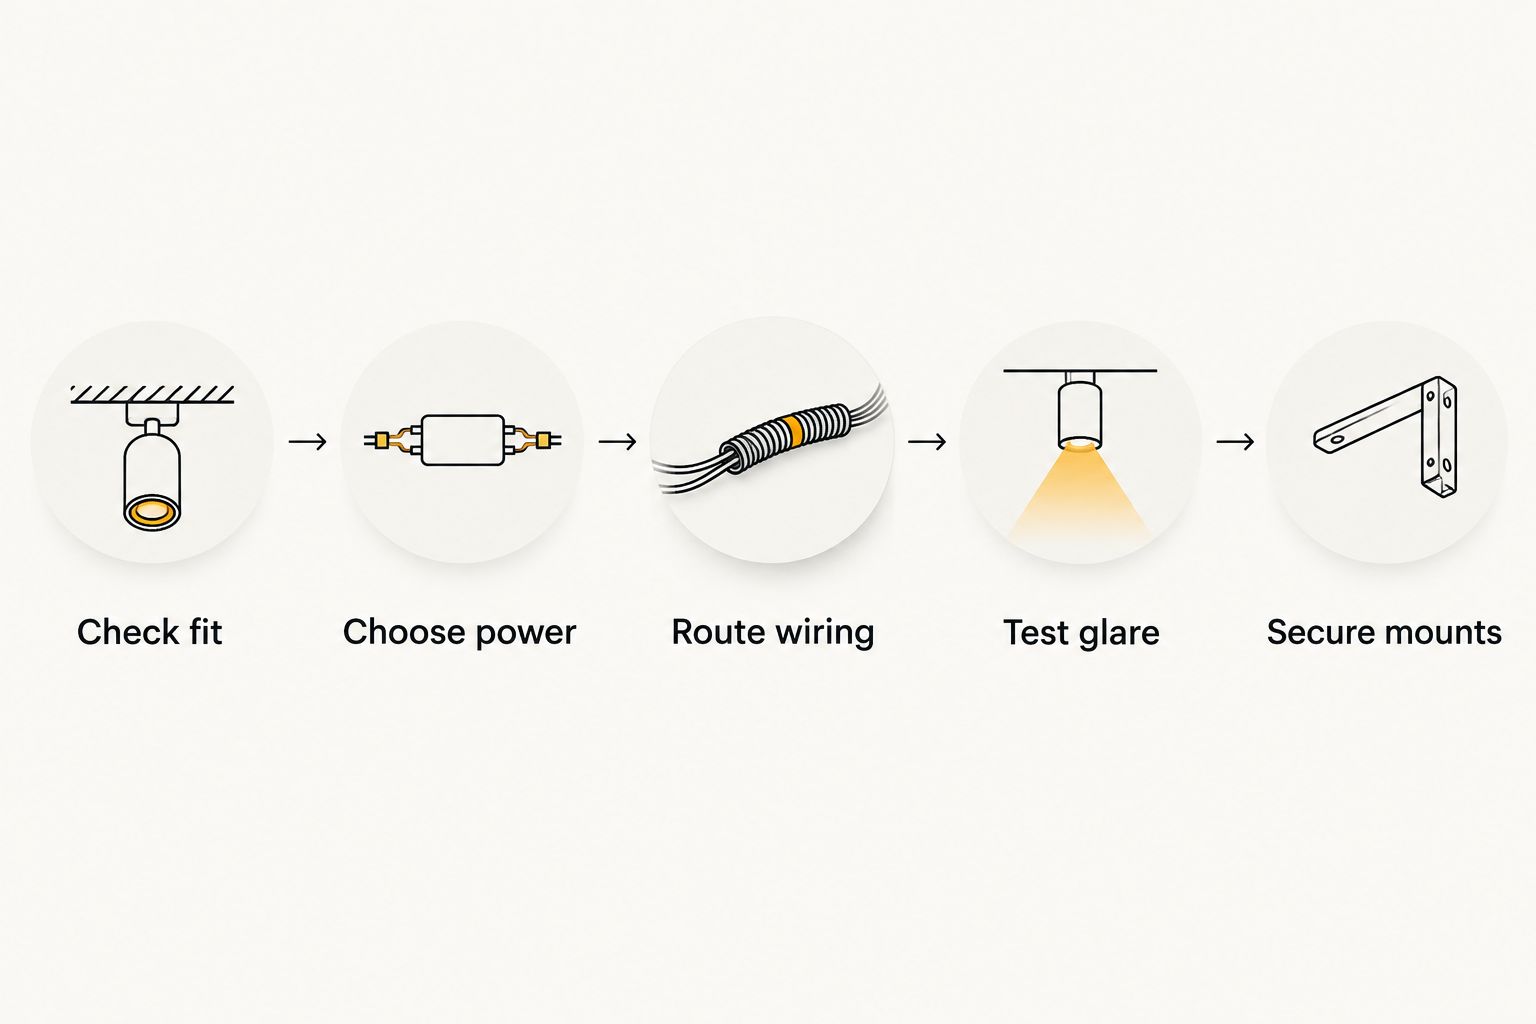
Plan the installation before routing wire
Finish the layout before connecting power. Use the vehicle service information and the kit instructions for electrical work; have a qualified installer handle connections you cannot verify.
Check fit
Confirm the machine model, roof, cage, and existing overhead accessories. Measure the mounting surface and test access with occupants seated. Do not assume a kit fits Polaris RZR, Can-Am Maverick X3, or Kawasaki KRX models interchangeably.
Choose power
Identify an approved accessory connection and confirm its voltage, available capacity, and switching behavior. Size wiring and circuit protection according to the installation instructions and actual load. Do not select a fuse from the light's physical size.
Route wiring
Follow the specified isolation procedure before electrical work. Keep wiring away from sharp edges, heat, moving components, and removable-panel pinch points. Support the harness, protect pass-through locations, and preserve a practical way to remove the roof if necessary.
Test glare
With the UTV parked after dark, check illumination from the driver's seat and each passenger position. Look for windshield reflections, visible emitters, and shadows over the buckle or storage area. Reposition the light before finalizing the mount if it misses the intended task.
Secure mounts
Tighten hardware to the manufacturer's instructions and confirm the wiring cannot pull on connectors. Check switch operation and inspect the installation again after the first ride. Movement, rubbing, or a loose connection needs correction before further use.
A dome light should make a parked task easier, not become another obstacle overhead. If you cannot find a mounting location that clears helmets and controls reflections, change the layout rather than forcing the installation.
How the configurations rank
The hardwired, diffused dome kit ranks first for permanent use because it combines fixed placement, vehicle power, and dedicated control. The clamp-mounted configuration takes the exposed-cage slot; the front-and-rear configuration addresses separate seating areas; the rechargeable option avoids vehicle wiring.
This ranking prioritizes useful coverage, secure mounting, appropriate power, accessible controls, environmental protection, and installation clarity. It is a buying decision tree, not a measured brightness or durability comparison between named products.
Which UTV dome lights should you choose?
Choose a hardwired, diffused LED dome kit unless your mounting layout or intended use points elsewhere. It is the default for permanent cab illumination, provided the exact kit fits your vehicle and electrical setup.
Choose clamps when the cage is your mounting surface. Add separately controlled rear illumination when rear-seat tasks need it, and choose rechargeable lighting when you want occasional parked use without wiring.
Before ordering for a 2026 build, write down the mounting location, power source, switch location, and task the light must illuminate. If you cannot answer those questions, finish the layout first. R1 Industries is an aftermarket UTV parts retailer; match any selected accessory to your actual machine and installed equipment.
FAQ
What's the best type of UTV dome light for everyday use?
A hardwired, diffused LED dome kit is the default choice for permanent cab illumination. Confirm mounting fit, input voltage, circuit capacity, and switch placement before buying.
Are UTV dome lights the same as rock lights?
No. UTV dome lights illuminate the cab, while rock lights illuminate exterior areas around the vehicle; choose a light designed for the task and mounting location.
Can I install a dome light without drilling my UTV roof?
A compatible clamp-mounted kit can use a cage tube instead of a roof mounting surface. Check the actual tube dimensions and occupant clearance, and follow the mounting instructions.
Do I need separate dome lights for the rear seats?
Use separate rear illumination when a front light does not adequately cover rear buckles or storage. Independently switched lights let you illuminate the area you need without turning on every cab light.
Can I connect UTV dome lights directly to the battery?
Use a battery-fed connection only when the light and vehicle installation instructions permit it, with the specified wiring, switching, and circuit protection. Constant-power wiring allows the light to draw from the battery while the ignition is off.
Will a brighter dome light improve night-driving visibility?
A dome light is for cab tasks, not forward driving visibility. Interior light can create windshield reflections; check glare while parked and switch unnecessary cab illumination off before driving.
Is an IP67 dome light safe to pressure wash?
An IP67 rating does not establish pressure-washing suitability. Follow the manufacturer's cleaning instructions and check the protection of switches and connectors separately.
Is a rechargeable light a good substitute for a wired dome kit?
A rechargeable light suits occasional parked use without vehicle wiring. A permanent wired kit avoids separate charging, while a removable light requires a secure mounting arrangement or stowing before riding.
One last thing
Test a temporary light from the proposed mounting position before installing the kit. Park after dark, sit in your normal driving position, and look for reflections across the windshield. Then reach for the buckle and storage you actually use.
A brighter lamp will not fix light aimed at the wrong place. Get the position right first.