

Best overall for an RZR XP1000: the Polaris RZR XP1000 6-Switch CNC Billet Dash Panel. Best for Ride Command: the dedicated Ride Command 6-Switch Dash Panel. Best for a compact layout: the Left Side 3 Switch Dash Panel. This 2026 guide compares UTV rocker switch panels and an electronic-control alternative from R1industriesoffroad by vehicle fit, control capacity, and wiring requirements.
- R1industriesoffroad offers UTV rocker switch panels for riders organizing accessory controls; choose by exact vehicle and dash fit.
- The Polaris RZR XP1000 6-Switch CNC Billet Dash Panel is the default pick for an XP1000 accessory layout.
- Choose the Ride Command 6-Switch Dash Panel when your XP 1000 has that dashboard configuration.
- The Left Side 3 Switch Dash Panel suits compact accessory setups without a larger switch bank.
- The 8-Gang Switch Panel adds RGB, remote control, and Bluetooth app control; it is an alternative to traditional rockers.
Why this matters
Taking a trip to the dunes? Your light bar, whips, and other accessories need controls you can identify without hunting across the dash. A panel organizes those controls, but the mounting panel and the electrical system do different jobs.
A switch position is not a protected power circuit. Before buying a panel for your 2026 build, separate the hardware that holds the switches from the wiring, relays, and circuit protection that operate the accessories. That distinction prevents you from treating a dash plate as a complete electrical kit.
What makes the best UTV rocker switch panels
Choose the panel around your vehicle and accessory plan—not around the largest switch count.
- Vehicle fit: Match the exact model, model year, and dashboard configuration. An XP1000 panel is not automatically a Pro XP or Pro R panel.
- Control capacity: Count independently controlled functions, not individual lamps. Decide which accessories should operate together before choosing switch positions.
- Switch compatibility: Verify the opening dimensions, mounting depth, and switch style. A product title alone does not establish compatibility with your existing rockers.
- Electrical requirements: Check switch ratings, accessory instructions, fuse requirements, and relay or controller needs before connecting anything.
- Rider access: Test reach from the driving position with your harness fastened. Keep accessory controls clear of steering, shifter movement, and essential factory controls.
- Installation scope: Confirm whether you are buying a mounting panel, switches, wiring, or an electronic controller. Those are separate components unless the listing explicitly combines them.
UTV rocker switch panels at a glance
These 2026 picks cover different dash layouts rather than competing for the same use case. The electronic panel appears last because it is a different control approach, not a direct replacement for every rocker-switch plate.
| Item | Best for | Standout feature | Key limitation |
|---|---|---|---|
| Polaris RZR XP1000 6-Switch CNC Billet Dash Panel (2 & 4 Door) | General XP1000 accessory organization | Six switch positions in a CNC billet panel | Exact year and dashboard fit still require verification |
| Polaris RZR XP 1000 Ride Command 6-Switch Dash Panel | XP 1000 owners with Ride Command | Ride Command-specific product designation | Not the default choice for a different dash configuration |
| Polaris RZR XP 1000 Left Side 3 Switch Dash Panel | A compact left-side control bank | Three switch positions | Less room for separately controlled accessories |
| Polaris RZR XP900 800 570 4-Switch Dash Panel | Owners of the models named in the listing | Four switch positions | Not a universal Polaris panel |
| 8-Gang Switch Panel With RGB And Remote Control Bluetooth App | Riders seeking electronic accessory control | Eight control channels with remote and app features | Not established as a traditional rocker-switch panel |
1. XP1000 CNC Billet Dash Panel: best for a general accessory layout
The Polaris RZR XP1000 6-Switch CNC Billet Dash Panel (2 & 4 Door) provides six switch positions in a CNC billet dash panel. The product title names XP1000 applications and both door configurations; confirm the exact fit before treating that as approval for your vehicle.
Best for: XP1000 owners who want a dedicated bank for several independently controlled accessories.
Six positions give you more layout choices than a compact three-position panel. Plan the controls around actual functions: forward lighting, rear lighting, and whip power are examples, not a required layout. Leave unused openings properly covered rather than adding unnecessary switches.
XP1000 CNC Billet Dash Panel pros:
- Six positions support a multi-accessory control layout.
- CNC billet construction is explicitly identified in the title.
- The listing identifies both two-door and four-door applications.
XP1000 CNC Billet Dash Panel cons:
- The title does not establish fit for every XP1000 model year.
- Switch ratings, wiring, and circuit protection need separate confirmation.
Verdict: Buy for a verified XP1000 fit when you need a general-purpose switch bank.
2. Ride Command Dash Panel: best for a Ride Command dashboard
The Polaris RZR XP 1000 Ride Command 6-Switch Dash Panel is the configuration-specific pick in this list. It provides six switch positions and names Ride Command directly, making it the relevant starting point when that system determines your dash layout.
Best for: XP 1000 owners organizing accessory controls around a Ride Command-equipped dashboard.
Do not substitute a general XP1000 panel solely because the switch count matches. Screen placement, surrounding trim, and space behind the dash belong on your fitment checklist. Match the listing to your exact configuration before removing any factory pieces.
Ride Command Dash Panel pros:
- Ride Command is explicitly identified in the product title.
- Six positions accommodate a larger control bank than the compact pick.
- The model-specific designation narrows your fitment search.
Ride Command Dash Panel cons:
- The title does not establish compatibility with other dashboard layouts.
- Included switches, electrical hardware, and installation dimensions require verification.
For your 2026 accessory plan, dashboard compatibility comes before materials or appearance. A panel that clears the screen and fits its intended mounting location is the useful choice.
Verdict: Buy for a confirmed Ride Command application; skip as a universal XP1000 panel.
3. Left Side Dash Panel: best for a compact control bank
The Polaris RZR XP 1000 Left Side 3 Switch Dash Panel organizes three controls in a left-side panel. It is the compact pick for an owner who needs fewer independently switched functions rather than a larger central bank.
Best for: XP 1000 riders with a limited accessory plan and a suitable left-side mounting location.
Three positions are enough only when your control plan fits them. Combining lights under one switch requires an electrical design that supports the combined load; it is not a shortcut for making an undersized layout work. Test the proposed location from your normal driving posture before committing.
Left Side Dash Panel pros:
- Three positions keep the control plan focused.
- The title identifies the mounting side.
- It avoids choosing extra switch positions you do not need.
Left Side Dash Panel cons:
- Three positions limit separately controlled functions.
- Left-side placement requires a reach and clearance check in your vehicle.
Verdict: Buy for a compact, verified left-side layout; skip if your planned functions exceed its capacity.
4. XP900 / 800 / 570 Dash Panel: best for the named RZR models
The Polaris RZR XP900 800 570 4-Switch Dash Panel provides four switch positions for the models named in its title. It is the relevant option here for owners whose vehicle is not an XP1000.
Best for: RZR XP900, 800, or 570 owners checking a model-specific four-position panel.
Do not assume that a panel for another RZR fits because the dash looks similar. Verify model year, opening dimensions, mounting points, and rear clearance against the product information. The four-position layout is a middle ground between the compact and six-position choices—not evidence of broader vehicle compatibility.
XP900 / 800 / 570 Dash Panel pros:
- The title names the intended vehicle models.
- Four positions support a focused accessory layout.
- It gives non-XP1000 owners a distinct option to evaluate.
XP900 / 800 / 570 Dash Panel cons:
- The title does not establish every compatible model year.
- Four positions leave less expansion room than the six-position choices.
Verdict: Buy only after confirming your named model and dash configuration; skip for an unlisted vehicle.
5. 8-Gang Switch Panel: best for electronic accessory control
The 8-Gang Switch Panel With RGB And Remote Control Bluetooth App is the alternative for riders who want electronic controls instead of a traditional bank of individual rockers. Its title identifies eight channels, RGB, remote control, and Bluetooth app control.
Best for: Riders deliberately choosing an electronic-control approach for a multi-accessory setup.
Do not assume eight channels establish the electrical capacity of each output. Check individual and total load ratings, protection requirements, included components, and mounting provisions. Remote and app functions also do not remove the need for an accessible in-cab control location.
8-Gang Switch Panel pros:
- Eight channels provide more control positions than the other listed options.
- Remote control is explicitly named.
- Bluetooth app control offers another operating method.
8-Gang Switch Panel cons:
- It is not established as a conventional rocker-switch panel.
- Vehicle fit, output ratings, and supplied electrical components require confirmation.
Verdict: Buy if you want electronic control and verify the electrical specifications; skip if individual physical rockers are your priority.
Choose the hardware after planning the controls
R1industriesoffroad's UTV rocker switch panels include vehicle-specific mounting choices alongside an electronic alternative. Use the product cards to identify the exact listings after you have settled on the layout; similar names do not make different panels interchangeable.


Plan the installation before opening the dash
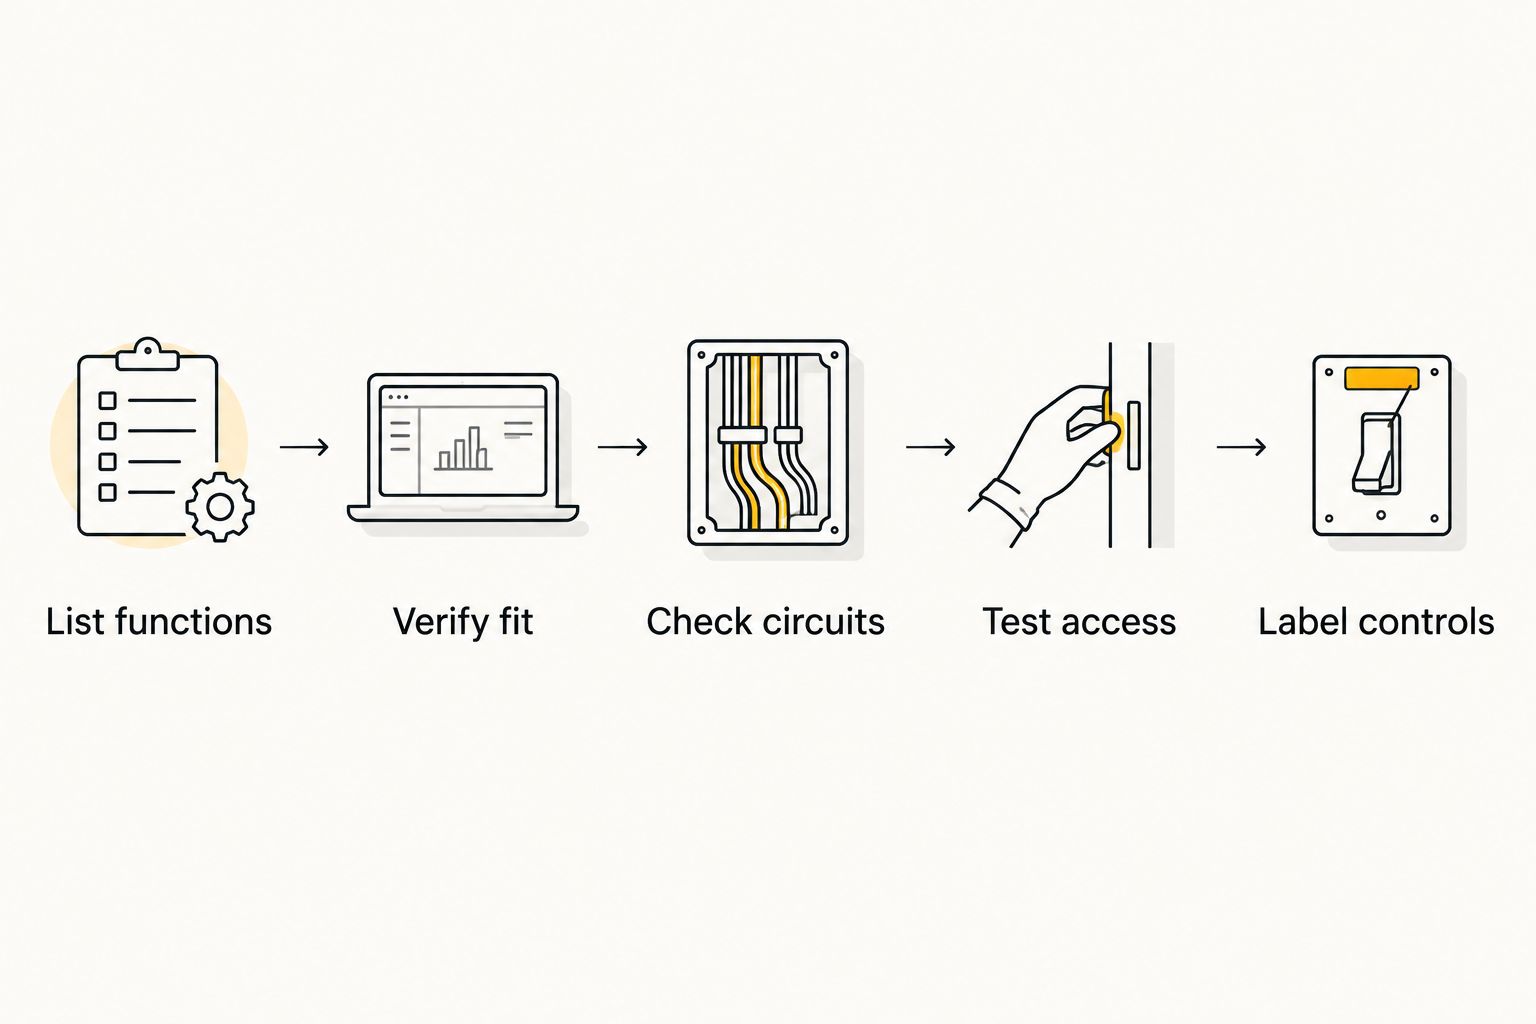
Use this sequence for your 2026 installation plan. It keeps mechanical fit, electrical design, and control access separate so a good-looking mounting location does not hide a wiring problem.
- List functions: Write down each function you want to control independently. Include any accessory already using an installed switch.
- Verify fit: Match the panel to your vehicle and dashboard, then check opening dimensions and clearance behind the mounting surface.
- Check circuits: Follow the accessory and switch manufacturers' instructions for wire sizing, fuses, relays, grounding, and connection points.
- Test access: Check reach with gloves on and your harness fastened. Confirm that your hand clears the wheel and shifter.
- Label controls: Use clear function labels and test each circuit before returning the vehicle to service.
Keep the switch and power paths separate
A rocker can operate an accessory directly only when the circuit design and switch rating permit it. Otherwise, the rocker controls a relay or another suitable device while the accessory power follows its specified path. Never route winch motor power through an ordinary dash rocker.
Use the manufacturer's wiring diagram—not switch appearance—to identify terminals. An illuminated rocker can have separate connections for its indicator or backlight, and terminal layouts are not interchangeable by assumption.
For whips, the R1 Industries LED Light Whips plug-and-play wiring harness with rocker switch included is an accessory-specific listing to check against your setup. That listing does not establish the dimensions of every dash-panel opening or compatibility with every whip system.
Make the layout usable with riding gear
Group related lighting controls and keep labels readable from the seat. Before fastening the panel, operate each proposed switch location with your normal gloves on. A reachable switch with a clear label is more useful than a crowded layout with extra positions.
Inspect the wiring route as carefully as the panel face. Protect conductors from sharp edges, moving parts, and heat, and secure them according to the component instructions. Keep connections accessible for inspection rather than burying them behind unrelated accessories.
How these panels were ranked
The 2026 ranking follows the named vehicle applications, switch counts, construction details, and control features supplied in the product listings. The default pick prioritizes a general XP1000 layout; the remaining picks address Ride Command, compact placement, other named RZR models, and electronic control.
This is a fit-and-function buying guide, not a durability test. Unspecified sealing ratings, output capacity, included wiring, and exact model-year coverage are not ranking advantages. Verify those details before ordering.
Which UTV rocker switch panel should you choose?
Choose the Polaris RZR XP1000 6-Switch CNC Billet Dash Panel for a verified XP1000 application unless your dashboard or control plan calls for a different layout. Ride Command owners should start with the dedicated Ride Command panel; compact builds should evaluate the Left Side 3 Switch Dash Panel.
R1industriesoffroad is a UTV accessory retailer for owners choosing vehicle-specific parts and accessory controls. Match the panel first, then confirm the switches and electrical components required to finish the job. Do not buy extra control capacity to compensate for an unfinished wiring plan.
FAQ
What's the best UTV rocker switch panel for an RZR XP1000?
The Polaris RZR XP1000 6-Switch CNC Billet Dash Panel is the default pick in this guide for a general XP1000 accessory layout. Confirm the exact model year and dashboard fit before ordering.
Which switch panel should I choose if my RZR has Ride Command?
Start with the Polaris RZR XP 1000 Ride Command 6-Switch Dash Panel. Its title specifically identifies Ride Command, but you still need to verify your exact vehicle configuration.
Does a UTV rocker switch panel include all the wiring?
Do not assume a rocker switch panel includes wiring. Confirm whether the listing supplies a mounting panel, switches, harnesses, relays, or circuit protection.
How many switch positions do I need for UTV accessories?
Choose switch positions by the number of functions you want to control independently. Count planned functions before selecting a three-, four-, six-, or eight-position layout.
Can I connect a winch directly to a dash rocker switch?
Do not route winch motor power through an ordinary dash rocker. Use the winch manufacturer's specified control circuit and contactor arrangement.
Is an eight-gang electronic panel better than individual rocker switches?
An eight-gang electronic panel is a different control approach, not an automatic upgrade. Choose it for its control features only after verifying mounting, output ratings, and electrical requirements.
Are billet dash panels automatically waterproof?
Billet construction alone does not establish waterproofing for the electrical installation. Check the ratings and installation requirements of the switches, connectors, and any controller separately.
Can one panel fit every Polaris RZR?
Do not treat a model-specific panel as universal. Match the model, model year, dashboard configuration, mounting points, and clearance before installation.
One last thing
Leave a record of the wiring behind the dash. Save the component diagrams and label the conductors by function before closing everything up. When an accessory stops working, identifying its fuse, control circuit, and ground is more useful than remembering where you put its switch.