

Best overall: a spot/flood combination light bar. Best for tight wooded trails: a flood-beam bar. Best for open trails: a spot-beam bar. Best for limited mounting space: a compact combination bar. This 2026 guide to UTV LED light bars from R1 Industries ranks beam configurations by riding conditions, then covers fitment, wiring, and aiming.
- For UTV LED light bars, a spot/flood combination beam is the default choice for mixed night trails.
- Choose flood lighting for nearby trail edges and spot lighting for the route farther ahead.
- R1 Industries serves UTV owners fitting aftermarket accessories; match lighting mounts to your exact vehicle and cage.
- Confirm beam pattern, mounting dimensions, electrical requirements, and windshield clearance before choosing a bar.
Why this matters
Taking a trip after dark? Your headlights and accessory lights need to reveal the trail, not just make the foreground look bright. A concentrated beam helps you see ahead, while a wider beam shows nearby turns, rocks, and trail edges.
The best light bar matches the ground you need to see from the driver's seat. A large housing or a high advertised lumen figure does not tell you where that light lands. For a 2026 night-riding setup, choose the beam first and the mounting location second.
These recommendations rank lighting configurations, not named products with unverified output claims. Use them to narrow your options before comparing individual manufacturers' specifications.
What makes the best UTV LED light bars
Check these six criteria before choosing a bar:
- Beam pattern: Match forward reach and nearby coverage to your usual terrain. Look for a beam diagram rather than relying on a spot, flood, or combo label alone.
- Mounting fit: Confirm bracket spacing, housing dimensions, cage diameter where applicable, and roof or windshield clearance.
- Electrical requirements: Read the rated current draw and installation instructions. Match the circuit, protection, wiring, and switching to that specific light.
- Weather protection: Look for a documented ingress-protection rating and instructions for protecting connectors. A sealed housing does not seal an exposed wiring connection.
- Driver-seat visibility: Check for hood glare, windshield reflections, and light spilling into the cab. Useful illumination stays outside your sightline.
- Adjustment and service: Choose a mounting arrangement you can aim, tighten, inspect, and clean without dismantling unrelated accessories.
For 2026 comparisons, favor documented beam information over unsupported brightness superlatives. Compare the same kind of measurement across products; total light output and illumination at a particular distance answer different questions.
UTV LED light bars at a glance
| Rank and configuration | Best for | Standout feature | Key limitation |
|---|---|---|---|
| 1. Spot/flood combination bar | Mixed night trails | Forward and nearby coverage in one housing | Beam balance varies by design |
| 2. Flood-beam bar | Tight wooded trails | Wide coverage close to the vehicle | Less concentrated illumination ahead |
| 3. Spot-beam bar | Open trails with long sightlines | Concentrated forward illumination | Limited coverage at nearby trail edges |
| 4. Compact combination bar | Restricted mounting space | Mixed coverage in a smaller mounting envelope | Coverage still depends on its specific optics |
The first decision is terrain, not bar length. Mixed trails need a balance; wooded switchbacks need nearby coverage; open routes need forward visibility; crowded mounting areas need a housing that actually fits.
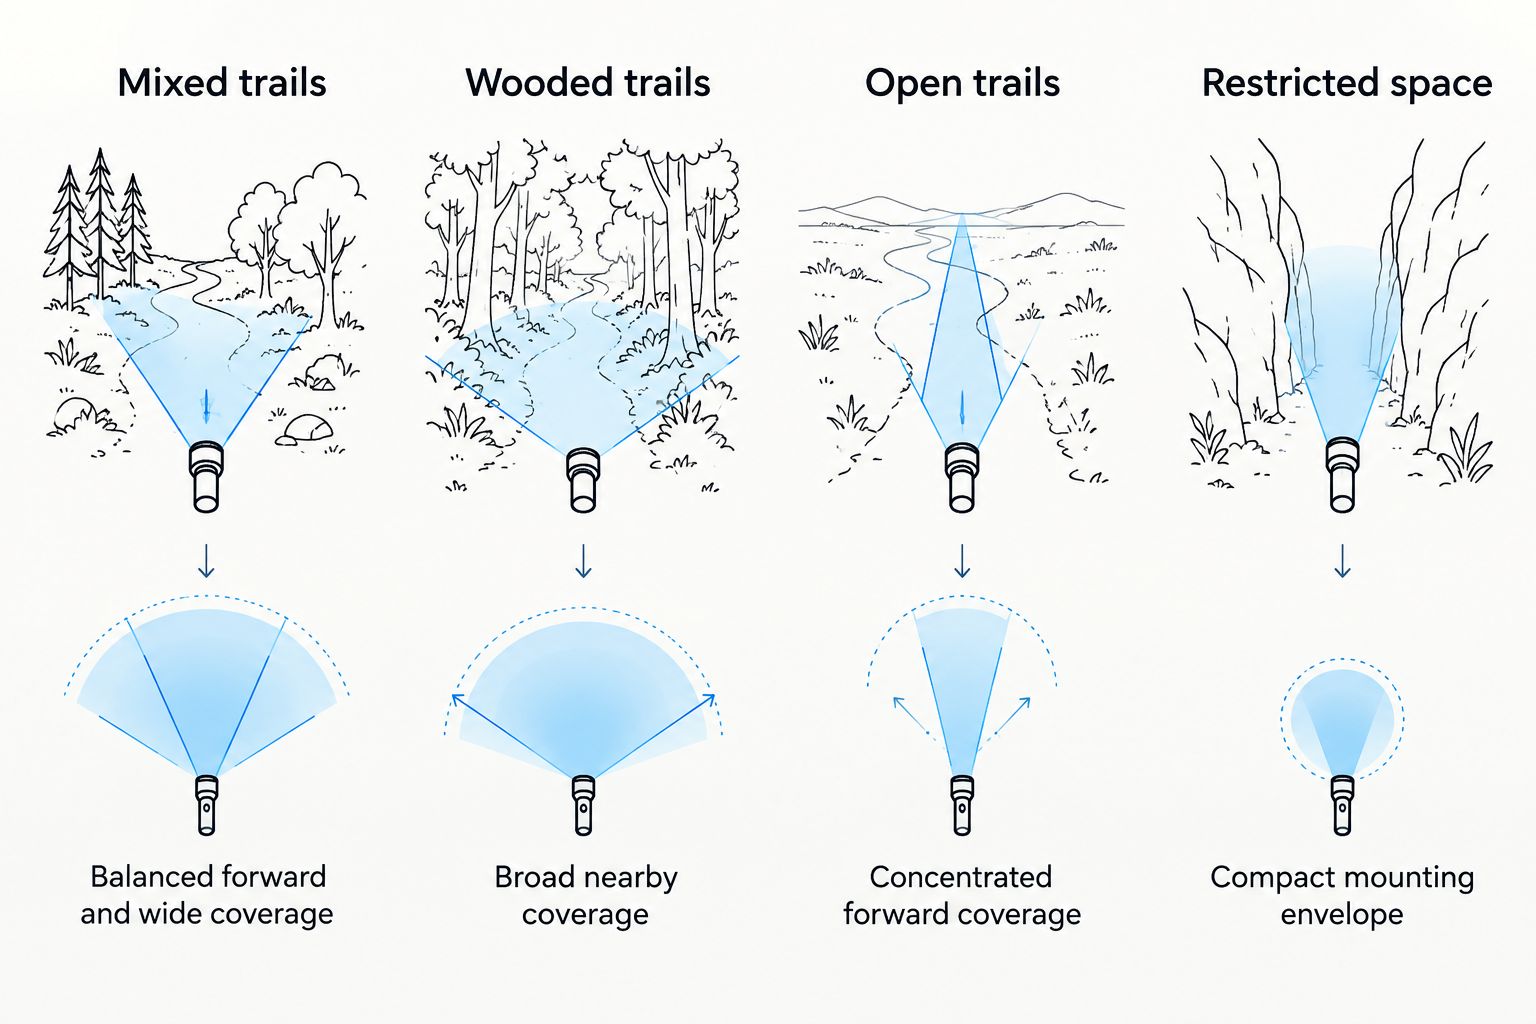
1. Spot/flood combination bar: best for mixed night trails
A combination bar uses optics intended to provide both concentrated forward light and wider coverage. It is the default choice when your ride changes from open stretches to turns, rocks, and uneven ground.
The balance matters. Two combination bars can distribute light differently, so compare their beam diagrams and confirm that neither the distant trail nor the nearby edges disappear from view.
Combination-bar pros:
- Covers forward travel and nearby obstacles with one housing.
- Suits routes that change terrain during the ride.
- Avoids making a pure spot or pure flood beam your only added lighting.
Combination-bar cons:
- Does not offer independent control of each beam unless the specific product supports it.
- Wide spill can reflect from a hood or windshield when poorly positioned.
- The combo label alone does not establish usable reach or width.
Best for: Riders who want one primary auxiliary bar for varied night trails.
Keep your factory headlights in the evaluation. The combination bar should fill visibility gaps rather than simply duplicate the brightest patch directly ahead of the bumper.
Verdict: Buy a spot/flood combination bar for a mixed-terrain setup once fitment and electrical requirements check out.
2. Flood-beam bar: best for tight wooded trails
A flood beam spreads light across a wider area near the vehicle. That pattern fits slow, technical riding where the next turn, nearby branches, and trail edges matter more than a distant straightaway.
Wide coverage helps you read the immediate path. It does not justify driving faster than the visible trail allows.
Flood-bar pros:
- Illuminates nearby trail edges and turns.
- Fits low-speed routes with frequent direction changes.
- Complements forward-focused lighting when the sides remain dark.
Flood-bar cons:
- Spreads output instead of concentrating it far ahead.
- Wide spill can increase distracting reflections from nearby surfaces.
- Does not replace focused lighting for longer sightlines.
Best for: Riders tackling tight woods, switchbacks, and slow technical trails.
Aim a flood bar with the driver seated and the windshield in its normal riding position. A beam that looks useful from outside the UTV can still create a bright reflection inside the cab.
Verdict: Buy a flood-beam bar for close-range trail coverage; skip it as the sole lighting upgrade for open-route riding.
3. Spot-beam bar: best for open trails with long sightlines
A spot beam concentrates light into a narrower forward pattern. It suits open routes where you need to inspect the path farther ahead rather than illuminate everything beside the vehicle.
The trade-off is coverage at the sides. A bright center beam can leave the entrance to a tight turn outside its strongest illumination.
Spot-bar pros:
- Directs light toward the route ahead.
- Complements existing lighting that already covers nearby ground.
- Fits terrain with long, unobstructed sightlines.
Spot-bar cons:
- Provides less nearby side coverage than a wide flood pattern.
- Requires careful aiming to place the concentrated beam usefully.
- Does not solve poor visibility around tight corners.
Best for: Riders on open trails whose existing lights already show nearby obstacles.
Do not use forward reach as permission to outrun your sight distance. Crests, turns, dust, and terrain still interrupt what you can see, regardless of the beam pattern.
Verdict: Buy a spot-beam bar to fill a forward-visibility gap; skip it as the only auxiliary beam for wooded trails.
4. Compact combination bar: best for restricted mounting space
A compact combination bar applies the same mixed-beam approach in a smaller housing. Consider this configuration when a roof edge, bumper opening, windshield mechanism, or other accessory limits the mounting envelope.
Compact describes fit, not guaranteed performance. Compare the actual dimensions and beam information rather than assuming a shorter bar is either sufficient or inadequate.
Compact combination-bar pros:
- Fits mounting areas that cannot accept a longer housing.
- Offers a mixed-beam option without requiring a roof-width installation.
- Lets you prioritize clearance around existing accessories.
Compact combination-bar cons:
- Still needs room for brackets, adjustment, and wiring.
- Its beam coverage cannot be inferred from housing length.
- A tucked-away location can obstruct part of the beam.
Best for: Owners whose preferred mounting location has limited usable space.
Check the complete assembly, not just the light body. End brackets and the connector can require additional clearance, and an adjustable mount needs space to move through its aiming range.
Verdict: Buy a compact combination bar when space is the constraint; hold until the full mounting envelope is confirmed.
Match the mount before ordering the light
R1 Industries offers UTV lighting mounts alongside other aftermarket accessories. For UTV LED light bars, the mount is a separate fitment decision: a vehicle-specific bracket does not establish compatibility with every bar.
The Polaris Pro R RZR roof-mount listing identifies a 30-inch application. The Can-Am Maverick R ATC Comp/Race Series bracket identifies a 50-inch application. Those are separate listed applications, not interchangeable size recommendations for all UTVs.
Top-tube brackets described as 90-degree mounts illustrate another mounting arrangement. Their orientation does not establish the correct cage diameter, bar width, or hardware for your vehicle; verify each detail independently.
Before choosing a mount, check:
- Vehicle identity: Exact model, model year, and relevant trim.
- Cage configuration: Factory or aftermarket cage, plus tube dimensions where required.
- Roof clearance: Space around the roof edge and mounting hardware.
- Windshield movement: Clearance throughout its normal opening and closing range.
- Bar dimensions: Housing width, mounting-point spacing, depth, and connector clearance.
The following product cards are mounting accessories, not complete LED light bars. Use the listed applications to start a fitment check, not to assume a universal match.


Wire and aim your 2026 night-riding setup
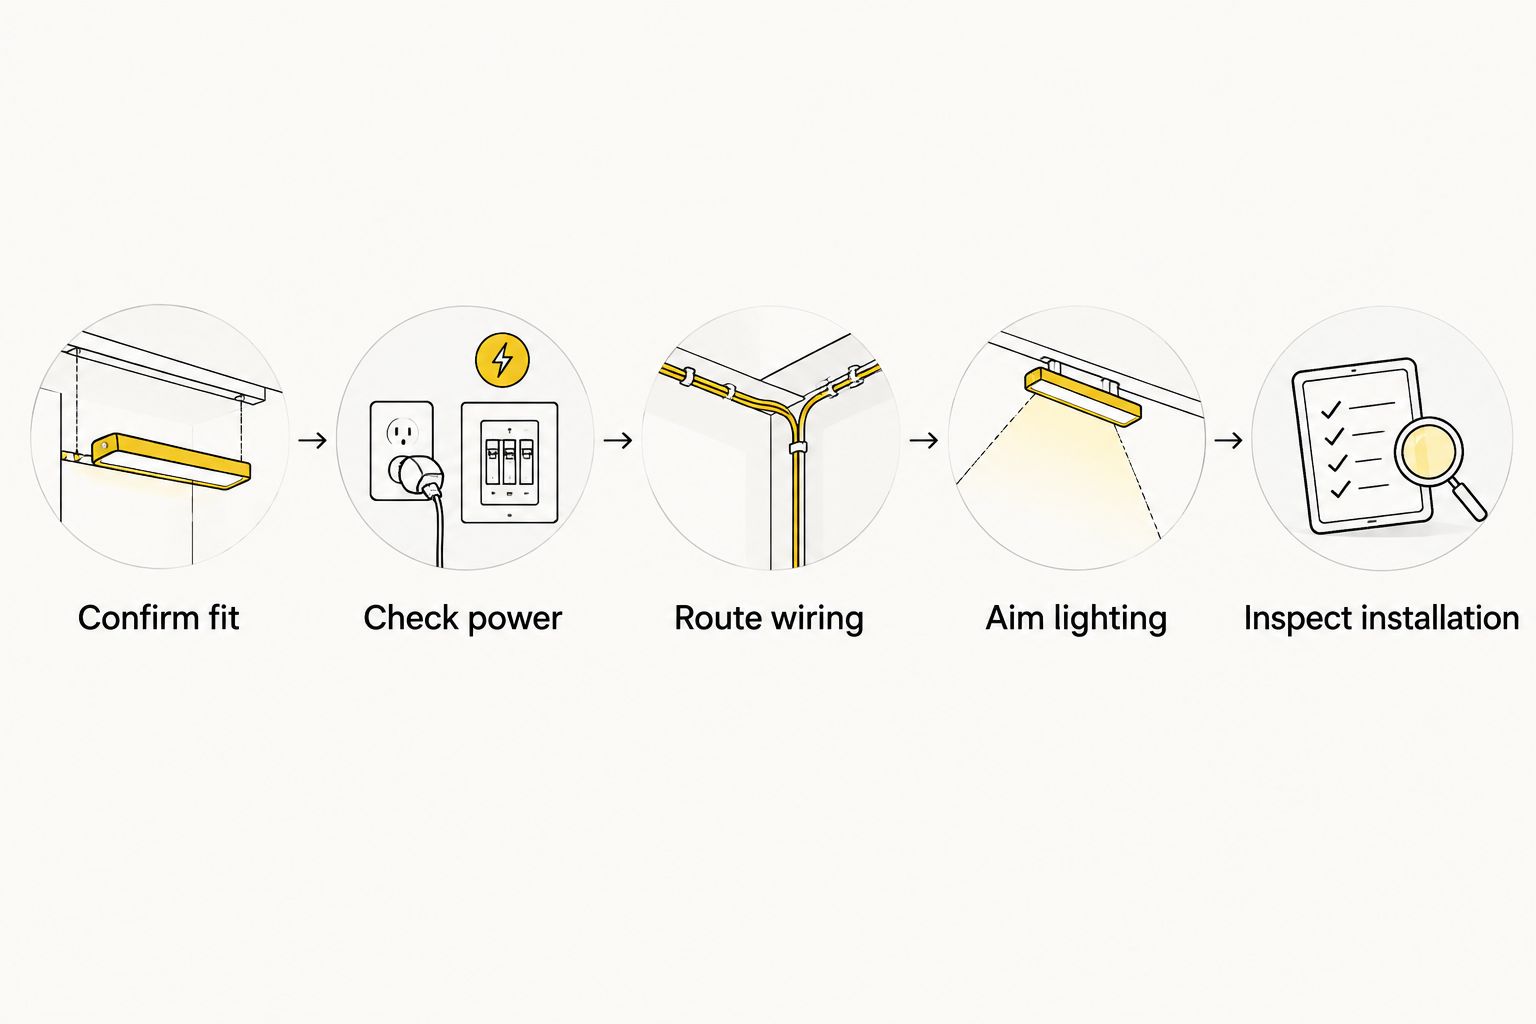
A correctly chosen beam still needs a sound installation. Follow the light manufacturer's instructions and your vehicle's accessory-power guidance; do not assume an unused switch position is a ready-to-use power circuit.
Confirm fit
Position the housing and brackets before routing wires. Check roof clearance, windshield movement, access to fasteners, and whether bodywork blocks the beam.
Check power
Confirm the light's current draw and required circuit protection. Account for other accessories using the same supply, and use wire, connectors, relays, and switches rated for the installation where specified.
Route wiring
Keep wiring away from exhaust heat, moving suspension parts, sharp edges, and pinch points. Protect passages through panels and support the harness so connectors do not carry its weight.
Aim lighting
Set the initial beam on level ground using the manufacturer's guidance. Evaluate it from the driver's seat with the windshield, roof, and normal riding load in place.
Inspect installation
Check fasteners, cable clearance, and operation before riding. Reinspect after the initial ride and follow the specified tightening instructions rather than guessing a torque value.
Give the light a clearly identified control you can reach without searching. The guide to UTV rocker switch panels for accessory control covers the related control-layout decision.
For a 2026 build, evaluate the entire night setup together. Forward lighting, nearby obstacle lighting, and lights that help others locate your vehicle serve different jobs; none should be treated as a substitute for all the others.
How the configurations are ranked
This ranking prioritizes beam coverage for the stated terrain, then mounting practicality and installation requirements. Combination lighting takes the default slot because mixed trails need both nearby coverage and forward illumination.
The specialist choices follow a decision tree, not a claim that one beam is universally stronger. Flood wins the close-range slot, spot wins the open-sightline slot, and compact combination lighting wins where mounting space controls the decision.
Which UTV LED light bar should you choose?
Choose a spot/flood combination bar unless your riding conditions clearly call for a specialist beam. Move to flood for tight technical routes, spot for open sightlines with adequate nearby lighting, or compact combination lighting when clearance limits your options.
R1 Industries is a retailer for UTV owners fitting aftermarket parts and accessories. Compare your chosen light's documented requirements with the vehicle and mounting arrangement before committing to the installation.
For 2026 night rides, make the final decision from the driver's seat. A useful beam reveals the path without filling your windshield with glare.
FAQ
What's the best beam pattern for UTV LED light bars?
A spot/flood combination beam is the default choice for mixed night trails. Choose a flood beam for nearby technical terrain or a spot beam when your existing lights already cover nearby ground.
Is a longer UTV light bar always better?
No, housing length alone does not establish useful illumination. Compare beam distribution, mounting dimensions, electrical requirements, and clearance for your vehicle.
Should I mount a UTV light bar on the roof or bumper?
Choose the location that provides a clear beam and confirmed mounting compatibility without distracting reflections. Roof and bumper installations each require checks for clearance, obstruction, wiring, and driver-seat glare.
Can I wire a light bar directly to a dashboard switch?
Only use a direct-switch arrangement when the manufacturer's instructions and component ratings support it. Use the specified circuit protection and relay arrangement where required; an available switch opening does not establish electrical capacity.
Are LED whips a replacement for a forward light bar?
No, LED whips and forward light bars serve different purposes. Whips help mark the vehicle's location, while a forward light bar illuminates the route ahead.
Will one light-bar bracket fit every Polaris RZR or Can-Am?
No, bracket compatibility depends on the stated vehicle application and mounting configuration. Confirm the model, year, cage, roof, and light dimensions before ordering.
Can I use an off-road light bar on public roads in 2026?
Off-road labeling does not establish public-road legality. Check the applicable state and local lighting rules, and keep auxiliary lighting off when its use is prohibited or creates glare for other road users.
One last thing
Before adding another light, clean your existing lenses and windshield, then check the beam aim. Dirt and reflections can interfere with the view even when the lighting hardware works correctly.
Judge the setup by what you can see, not by how bright the vehicle looks from outside. Stop before making adjustments, and switch auxiliary lights off when they interfere with another rider's view.