

Instead of fighting a shock bolt into place, connect your pro xp long travel kit by confirming the required shocks, mount locations, spacers, and hardware, then supporting the suspension so the mounting holes align without force. This guide covers the checks and installation sequence; the kit instructions and the correct Polaris service manual control every specification.
- A pro xp long travel kit needs verified shock compatibility; matching bolt holes alone does not establish fitment.
- R1 Industries serves UTV owners shopping aftermarket parts; kit-specific instructions must control shock-mount installation.
- Support the chassis and suspension separately before removing shock hardware.
- Verify clearance through the specified suspension range before alignment and a controlled test drive.
Why this matters
A shock that bolts into a bracket is not automatically correct for a long-travel suspension. Shock length, stroke, mounting width, and the suspension's intended travel limits must work together. Getting the bolt through the eyelet proves only that the holes line up at that position.
R1 Industries is best for UTV owners shopping aftermarket parts, not as a substitute for kit-specific installation instructions. Use R1 Industries as an aftermarket UTV parts shopping resource, while keeping the kit manufacturer's documentation beside the vehicle.
For a 2026 installation, match the instructions to your actual vehicle and kit revision—not simply the newest document you find. A publication date does not establish vehicle compatibility.
Before you start
- Documentation and fitment: Have the exact kit instructions, parts list, vehicle identification, shock identification, and applicable Polaris service manual. Confirm whether the kit retains your shocks, requires modified shocks, or specifies replacements before disassembly.
- Equipment and workspace: Use a level work area, wheel chocks, appropriately rated lifting equipment and stands, a separate suspension support, suitable hand tools, and a torque wrench covering the documented specifications. Arrange professional installation if you cannot safely support the vehicle and control suspension movement.
- The gotcha: A relocated shock mount changes the relationship between wheel movement and shock movement. Do not assume the original shock, spacer stack, brake hose, or travel limiter remains correct because the mounting bolt fits.
Stop before lifting the vehicle if shock compatibility or mounting hardware remains unresolved. Obtain the missing instructions from the kit manufacturer. Do not solve an undocumented fitment problem with washers, drilled brackets, or extra preload.
Shock and mount configuration
Identify the required shock arrangement
- Record the vehicle model, model year, seating configuration, and installed suspension package. Keep those details with your 2026 build record so later changes remain traceable.
- Match the kit part number and revision to the vehicle application. Check front and rear requirements separately; an instruction for a front A-arm mount does not establish the rear mounting arrangement.
- Identify the shocks by their labels or part numbers. Compare those identifiers with the kit's approved configuration, including any required shock service or modification.
- Lay out the supplied brackets, sleeves, spacers, bolts, nuts, and travel-control components by location. Compare the actual parts with the manufacturer's diagram before removing anything.
Expected result: You can identify the specified shock and hardware arrangement for each mounting location without guessing.
Choose the documented configuration
These are installation paths, not interchangeable upgrades. Follow only the path the kit manufacturer approves for your vehicle.
| Configuration | Best for | Benefit | Limitation |
|---|---|---|---|
| Existing shocks retained | Kits explicitly designed around the installed shocks | Keeps the approved existing shock assembly | Requires confirmation of length, stroke, mounts, and any specified tuning changes |
| Specified replacement shocks | Kits that require a different shock assembly | Uses the shock configuration named for the kit | Adds installation and setup requirements; replacements are not universal |
| Existing shocks professionally modified | Kits explicitly requiring shock modification | Retains an approved assembly after the required work | Requires the specified shock service before installation |
Do not select a configuration by appearance. A reservoir, spring color, or familiar vehicle name does not establish compatibility.
Chassis support and mount inspection
Prepare the vehicle safely
- Park on a firm, level surface and follow the service manual's lifting procedure. Secure the vehicle against movement, switch it off, and keep the key away from the work area.
- Lift only at approved points and place rated stands at the specified support locations. Never work beneath a vehicle supported only by a jack. Check stability before removing wheels or reaching into the suspension.
- Support the suspension component separately at the location specified by the installation procedure. Adjust that support to remove load from the shock fasteners before loosening them.
- Photograph the original shock orientation, mounting hardware, hose routing, and any electrical connections. Label removed parts by position rather than putting all hardware into one container.
Expected result: The chassis remains securely supported while the suspension support controls the component being disconnected.
Inspect the mounting surfaces
- Remove shock hardware in the sequence stated by the applicable instructions. Keep fingers out of pinch points as the shock separates from its mount.
- Inspect the mounting tabs, bolt holes, shock eyelets, bearings or bushings, and sleeves. Stop for cracks, distorted tabs, elongated holes, or damaged bearing components.
- Clean the contact surfaces and compare the mount with the kit diagram. Install relocation brackets or reinforcement components only when the approved procedure requires them.
- Separate reusable hardware from hardware that the instructions require you to replace. Follow the stated requirements for locking nuts, thread treatment, and fastener condition.
Expected result: The mounting structure is serviceable, and every required bracket and fastener has an identified location.
A 2026 checklist should record actual findings rather than a blanket checkmark for suspension condition. A damaged tab requires repair assessment before assembly; tightening a bolt does not repair the bracket.
Shock installation and hardware alignment
Position the shock assembly
- Fit the specified sleeves and spacers in the order and orientation shown in the kit instructions. Do not substitute a stack of general-purpose washers for a missing spacer.
- Position the shock with the reservoir, hose, adjusters, and any wiring facing the documented direction. Support its weight rather than letting it hang from a hose or electrical lead.
- Install the first mounting connection in the manufacturer's specified sequence. Keep the assembly supported while bringing the remaining eyelet toward its bracket.
- Raise or lower the suspension support gradually until the remaining mounting holes align. Keep hands clear of moving joints, then insert the specified bolt without using it to pull misaligned parts together.
Expected result: The shock sits in the documented orientation, with correctly seated spacers and mounting bolts that enter without forcing the bracket apart.
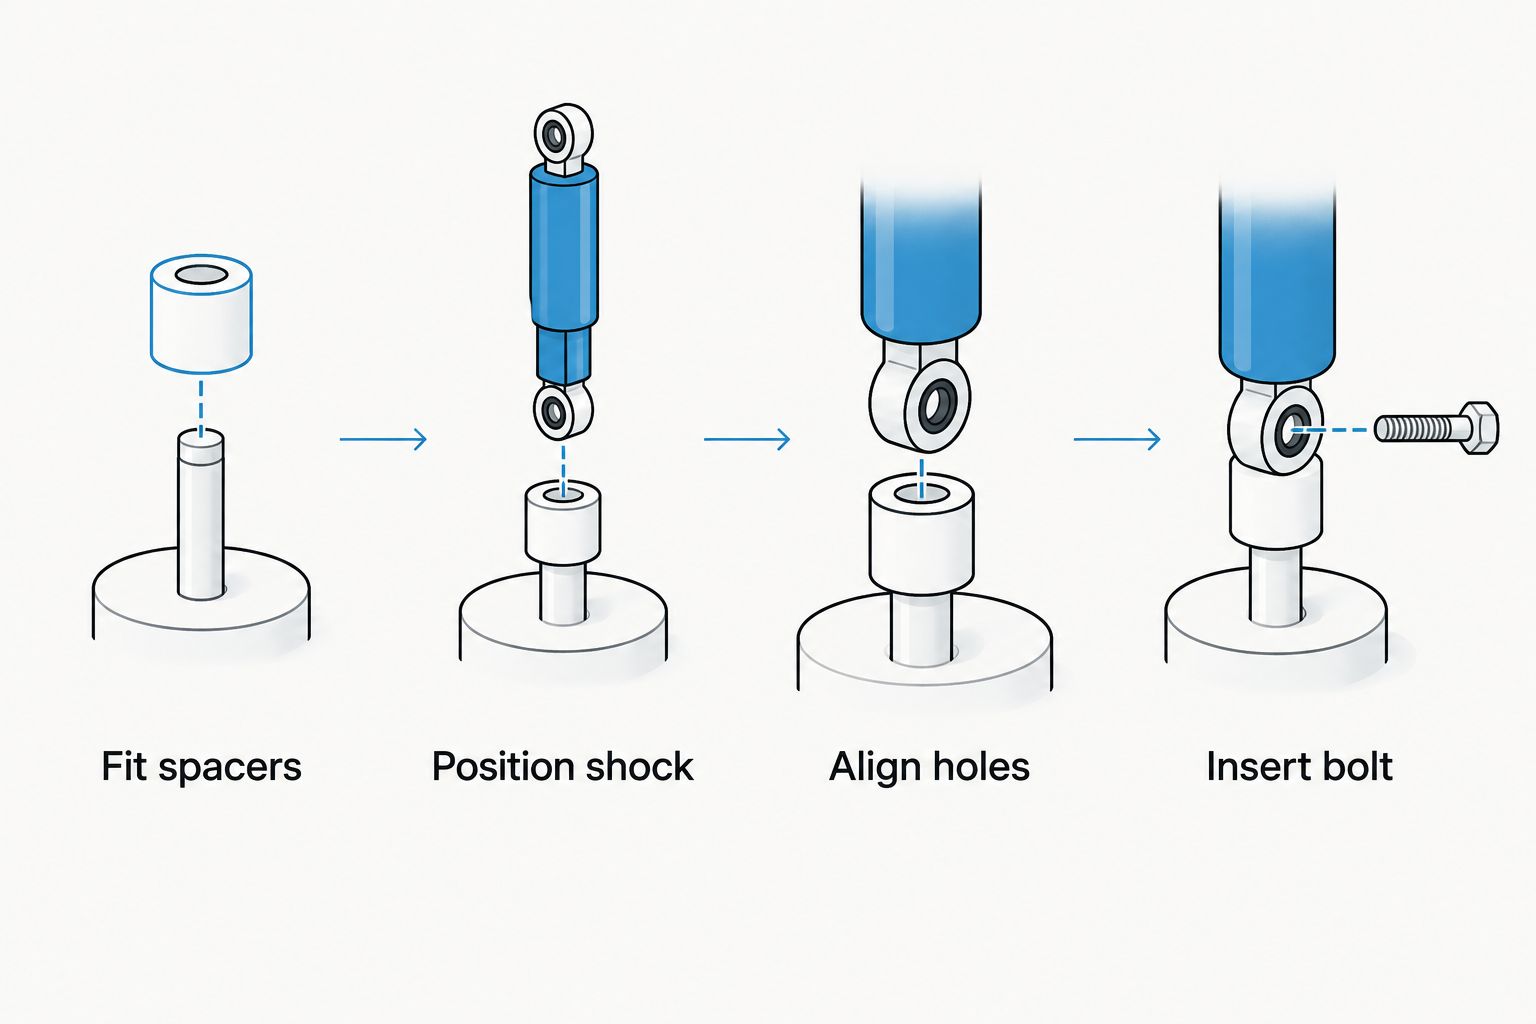
Secure the connections correctly
- Check that sleeves and spacers remain seated as you bring the hardware together. Confirm bolt direction and fastener engagement against the installation diagram.
- Tighten each connection using the specification for that exact joint and hardware. Where the instructions require a particular suspension position for final tightening, establish that position first.
- Apply lubricant, threadlocker, or another thread treatment only where specified. A torque specification depends on the stated fastener and thread condition.
- Record completed torque checks by location. Reinstall any required retainers, clips, hose supports, and wiring attachments before proceeding.
Expected result: Every shock connection is assembled and tightened according to its controlling specification, with no unidentified leftover mounting parts.
Do not copy a torque value from another RZR model or from an unrelated fastener of the same diameter. There is no universal shock-mount torque for a Pro XP long-travel conversion.
Suspension clearance and final setup
Verify movement before driving
- Follow the kit's procedure for checking suspension movement and steering clearance. Some checks require spring removal or a particular shock configuration; have a qualified suspension technician perform work involving stored spring energy.
- Inspect the front suspension at the prescribed compression and droop positions, including steering movement. Check shock clearance, joint articulation, axle behavior, brake-hose slack, and wiring routing.
- Inspect the rear suspension through its specified range. Check the shock body, reservoir routing, axle joints, brake hoses, and any required travel-limiting components.
- Confirm that the specified components control compression and droop. Do not assume the shock should act as the travel stop unless the approved design explicitly uses it that way.
Expected result: The suspension completes the required checks without interference, stretched hoses, trapped wiring, or an undocumented travel limit.
Check all 4 corners, not just the easiest shock to reach. The 2 front corners need steering-clearance checks, while the 2 rear corners need their own routing and articulation checks.
Finish the setup
- Reinstall wheels and remaining components using the applicable procedures. Set the vehicle down only after confirming that tools and supports are clear.
- Establish ride height, spring settings, and alignment using the kit and shock instructions. Do not use added preload to disguise incompatible shock dimensions.
- Check electronically controlled shocks, where fitted, using the applicable service procedure. Resolve warnings before driving.
- Perform the specified controlled test and post-installation inspection. Stop immediately for binding, abnormal noise, fluid leakage, steering problems, or contact marks.
Expected result: The vehicle meets the documented setup requirements and passes its installation checks before normal riding.
For a 2026 build, retain the completed inspection record with the kit instructions. The broader long-travel suspension installation guide covers the surrounding installation workflow; it does not replace your kit's specifications.
Reconnecting shocks after suspension service
Reconnecting an approved assembly after service differs from installing an unverified combination. The existing setup provides a record to check, but it does not excuse inspection.
- Compare the serviced shock identifiers and work record with the approved kit configuration.
- Confirm that spacers, sleeves, and brackets returned to their assigned locations.
- Reinspect mounts and replace hardware where the instructions require it.
- Repeat clearance checks whenever service changes shock dimensions, mounting components, suspension arms, or travel limits.
Repeat the relevant installation checks after a configuration change. A previous successful ride proves nothing about a newly installed shock or relocated bracket.
Troubleshooting shock-mount problems
The mounting bolt will not slide through
Adjust the separate suspension support to remove load and align the holes. Check the spacer arrangement and component orientation if alignment remains wrong. Do not hammer the bolt through or tighten the nut to drag the eyelet into position.
The eyelet does not fit between the mounting tabs
Compare the eyelet, bearing sleeves, and spacers with the kit diagram. Stop if the mounting width is incorrect. Do not grind spacers or spread tabs without an explicit manufacturer-approved procedure.
The reservoir or hose contacts another component
Verify shock orientation and the specified reservoir mounting location. Repeat the prescribed movement check after correcting routing. Do not bend a hose sharply or remove a required support to gain clearance.
A brake hose or wire becomes tight at droop
Stop the movement check before stretching the line or connector. Confirm routing and whether the kit requires extended lines, revised supports, or travel-control components. Do not drive until the documented solution is installed and checked.
The suspension binds or makes a new clunk
Stop testing and inspect for contact, loose hardware, missing sleeves, incorrect brackets, and joint limits. If the cause is not clear, have a qualified suspension shop inspect the assembly. Another tightening pass is not a diagnosis.
Customize your workflow
Build the installation around a location-based checklist. Keep front and rear hardware separate, attach the controlling specification to each joint, and record changes to shocks or brackets.
For 2026 maintenance, use the same record when inspecting the vehicle after riding. R1 Industries aftermarket UTV parts shopping should start with a confirmed application, not a similar-looking component. A tender-spring change, long-travel conversion, and replacement shock each address different parts of the suspension setup.
FAQ
Can I use stock shocks with a Pro XP long travel kit?
Use stock shocks only when the exact long-travel kit approves your installed shock configuration. Confirm shock identification, mounting hardware, and any required modifications before disassembly.
Do I need shock relocation brackets for a Pro XP long-travel kit?
Install relocation brackets only when the kit instructions specify them. The required mounting arrangement depends on the kit and vehicle application, not simply the Pro XP name.
What torque should I use on Pro XP shock-mount bolts?
Use the torque specification assigned to that exact connection by the applicable kit instructions or Polaris service manual. Match the specified hardware, thread condition, and tightening position; do not borrow a value from another model.
Why will my shock bolt not line up after installing long-travel arms?
Check suspension support position, spacer arrangement, component orientation, and shock compatibility before inserting the bolt. Do not use the fastener to pull misaligned mounting parts together.
Can I compress the spring to make a shock fit the mounts?
Do not treat spring compression as a fix for incompatible shock dimensions. Follow the manufacturer's installation procedure, and have a qualified technician handle any required spring removal or shock modification.
Does a long-travel kit automatically add lift height?
Long travel and lift height are different measurements. Use the kit's documented suspension geometry and setup instructions rather than assuming a wider suspension creates a particular ride-height increase.
What should I check before riding after a long-travel installation?
Complete the specified torque, clearance, travel-limit, hose-routing, wiring, ride-height, and alignment checks before driving. Follow the controlled test and reinspection procedure, and stop for interference, binding, leaks, or abnormal noise.
One last thing
A bolt that fits at ride height does not prove the shock fits through the suspension's working range. Make clearance verification the final gate, not a quick glance after tightening. Contact at compression or tension at droop can remain hidden while the vehicle sits level in the shop.
